TABLE of CONTENTS
- About
- Using SSDTs vs.
DeviceProperties– some considerations - Method 1: Using AMD Radeon Patches by mattystonnie
- Method 2a: Selecting specific AMD Framebuffers via
DeviceProperties - Method 2b: Using PowerPlay Tables
- Addendum: SSDT vs.
DeviceProperties - Credits
- Further Resources
This chapter contains 2 methods for improving the performance of AMD Radeon Graphics Cards when running macOS:
- Method 1: Utilizes SSDTs to inject GPU Properties and PowerPlay data into macOS to optimize performance in OpenCL and Metal applications while lowering the overall power consumption of the card. This method tries to mimic how the GPU would operate in a real Mac.
- Method 2 (recommended): Utilizes
DevicePropertiesto select specific Framebuffers (method 2a) and inject PowerPlayInfo tables (method 2b). Methods 2a and b can be combined.
Important
According to Whatevergreen's Radeon FAQs, using named framebuffers is not recommended: "Named framebuffers (Baladi, Futomaki, Lotus, etc.), enabled by Clover's GPU injection or any other methods should never ever be used. This way of GPU injection is a common mistake, preventing automatic configuration of various important GPU parameters. This will inavoidably lead to borked GPU functioning in quite a number of cases."
- Combining methods 1 and 2 can be problematic if the SSDT also injects values for the same device properties as the config.plist.
- At best, the value(s) injected via the SSDT would be overwritten by the one(s) defined by
DevicePropertiesin the config.plist. - In the worst case, you could inject conflicting settings.
- However, if you only need the SSDT to inject the correct ACPI path into macOS to get the card working, you can combine both.
- If you want to inject properties into macOS only, doing it via
config.plistis the way to go. Because injecting variables via ACPI affects the whole system and could affect other Operating Systems and in some cases does have no effect in Catalina and newer (→ see "Addendum")
In my experience using an AMD RX 580 card, combining methods 2a and 2b give he best results.
Disclaimer: Use at your own risk! In general, these patches have to be regarded as "experimental". They may work as intended but that's not guaranteed.
- Select the SSDT corresponding to your GPU model located in the "mattystonnie" folder, export it as
.amland add it to addEFI/OC/ACPIand config.plist.- For RX 580: add
SSDT-RX580.aml - For RX 5500/5500XT: add
SSDT-RX5500XT.aml - For RX 5600/5700/5700XT: add
SSDT-RX5700XT.aml - For RX Vega 64: add
SSDT-RXVega64.aml
- For RX 580: add
- Add the following Kexts to
EFI/OC/Kextsand config.plist:DAGPM.kext→ EnablesAGPM(Apple Graphics Power Management) Controller for AMD Cards which optimizes power consumption.Lilu.kextWhatevergreen.kext
- Add Boot-arg
agdpmod=pikera(Navi GPUs only!) → Fixes black screen issues on some GPUs. - Save your config, reboot and run some benchmark tests for comparison.
NOTE: These are slightly modified and improved variants of mattystonnie's tables. The following has been added to them:
- The
PEGPtoEGP0rename is integrated in the SSDTs (where required), so you don't need to add any binary renames. - The
DTGPmethod which is required bySSDT-RX580is contained within the table itself now, so you no longer needSSDT-DTGP.
With this method, you don't need Whatevergreen and DRM works when using SMBIOS iMacPro1,1 or MacPro7,1.
- Run Hackintool
- Click on the "PCIe" Tab
- Find your GPU (should be listed as "Display Controller")
- Right-click the entry and select "Copy Device Path":

- Mount your EFI
- For Navi Cards, add
SSDT-NAVI.amltoEFI/OC/ACPIand the config.plist - Disable
Whatevergreen.kext - Disable boot-arg
agdpmod=pikera - Under
DeviceProperties/Addcreate a new child - Set it to "Dictionary"
- Double Click its name and paste the PCI path:

- Double Click its name and paste the PCI path
- Create a new child
- Type: String
- Name: @0,name
- Value: select the one for your GPU model from the list below:
- RX6900 →
ATY,Carswell - RX6800 →
ATY,Belknap - RX6600/XT →
ATY,Henbury - Radeon 7 →
ATY,Donguil - RX5700 →
ATY,Adder - RX5500 →
ATY,Python - RX570/580 →
ATY,Orinoco
- RX6900 →
- In this example, we use
ATI,Henbury(without blank space):
- Save and reboot.
SOURCE: Insanelymac
Note
The Framebuffers listed above have been removed from macOS Sonoma, so this setting no longer has any effect.
With this method, you can inject all sorts of parameters into macOS to optimize the performance of your card such as: Power Limits, Clock Speeds, Fan Control and more without having to flash a modified vBIOS on your card. Combined with selecting specific AMD Framebuffers via the @0,name property, this is probably the best solution to optimize the performance of your AMD card under macOS.
You can use PowerPlay Table Generators by MMChris to generate a PP_PhmSoftPowerPlayTable device property for Radeon VII, Vega64 and RX5700 cards. These are basically Excel spreadsheets which generate the necessary hex values.
There's another method for obtaining PowerPlay Tables for Navi Cards under Windows using Tools and Registry Editor.
The Workload policy lets you select what type of workload or tasks the GPU is primarily used for. Depending on the selected policy, your GPU may require less power (Compute) or more (for 3D and VR Applications).
The Workload Policy can be added as a DeviceProperty. The following policies are available:
| Value (HEX) | Number (DEC) | Workload Policy |
|---|---|---|
| 0x01 | 1 | DEFAULT_WORKLOAD (default) |
| 0x02 | 2 | FULLSCREEN3D_WORKLOAD |
| 0x04 | 4 | POWERSAVING_WORKLOAD |
| 0x08 | 8 | VIDEO_WORKLOAD |
| 0x10 | 16 | VR_WORKLOAD |
| 0x20 | 32 | COMPUTE_WORKLOAD |
| 0x40 | 64 | CUSTOM_WORKLOAD |
To specify a Workload policy, do the following:
- Mount your EFI
- Open your
config.plist - Add Key
PP,PP_WorkLoadPolicyMaskto theDevicePropertiesof your GPU - Data Type: Number
- Add the corresponding Number (Dec) of the Workload Policy you want to use.
- Save your config.plist and reboot.
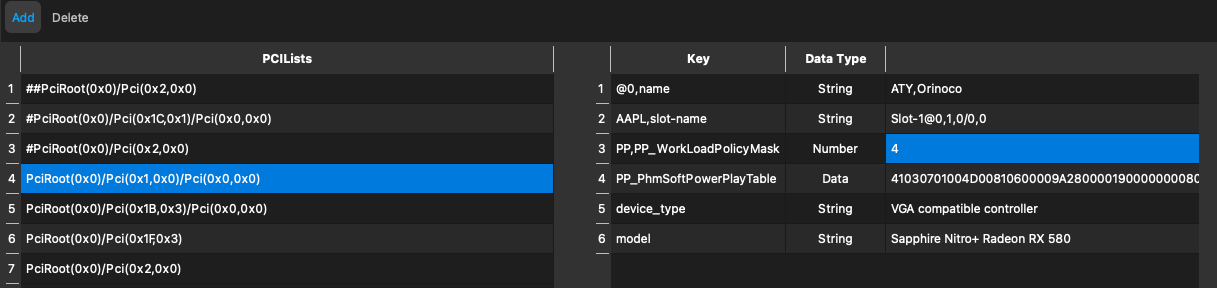
Example: I use 4 since I use the GPU simply for running two displays. Occasionally, I might switch it to 8 if I need to render some video:
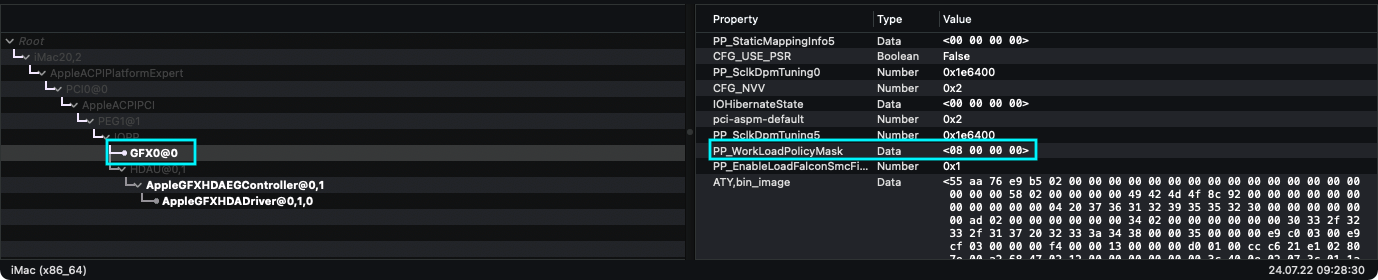
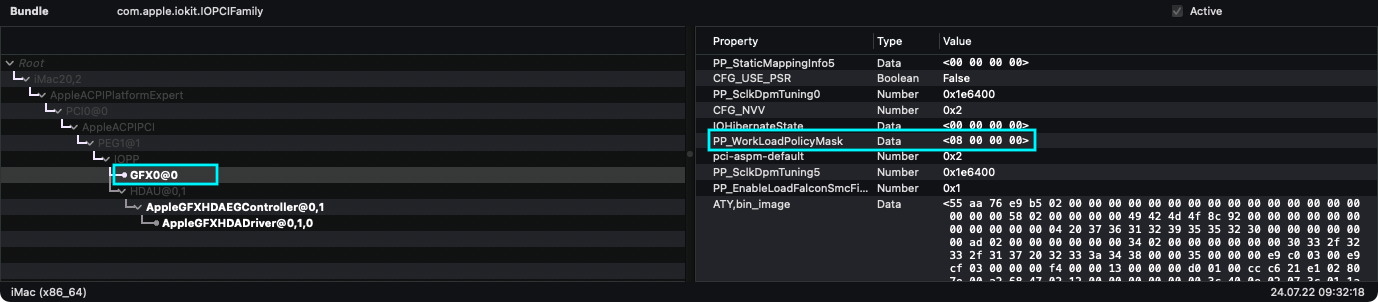
Acidanthera's AMD Radeon FAQs suggests calling the property PP,PP_WorkLoadPolicyMask, but I have seen configs and guides which use PP_WorkLoadPolicyMask instead. It seems that both methods work. The only difference is that when using PP,PP_, the property is listed alphabetically among other PowerPlay Table entries, while using PP_ puts the entry in a different position in the list.
You can check this yourself: in IORegistryExplorer, search for GFX0. The property is listed as PP_WorkLoadPolicy in both cases, just sorted differently. It seems that the comma can be utilized as a modifier for sorting entries in the IO Registry.
When using PP,PP_WorkLoadPolicyMask:
When using PP_WorkLoadPolicyMask:
I've noticed that SSDT-RX580 doesn't work as expected in macOS Catalina and beyond. In my tests, the performance didn't improve noticeably and power consumption wasn't reduced as well – around 100 Watts in idle which seems too high, imo. Also, AGPMController was present in IO Registry already without DAGPM.kext, so it's not a requirement (same goes for AGPMInjector.kext by Pavo-IM).
On page 35 and following, I found another approach utilizing DeviceProperties to inject the data into macOS instead. This worked. It improves performance and reduces power consumption as well (70 Watts in idle instead of 100).
I've added plists for both Clover and OpenCore to the "mattystonnie" folder. You can copy the included properties to the corresponding section of your config.plist. Ensure that the PCI paths and AAPL,slot-name1 match the ones used in your system and adjust them accordingly. Disable/delete the SSDTs and DAGPM.kext when using this method.
- Acidanthera for Lilu and WhateverGreen.kext
- mattystonnie for the SSDTs and original Guide
- Baio1977 for implementing device renames into the mattystonnie SSDTs
- Toleda for
DAGPM.kext - CMMMChris for PowerPlay Table Generators
- hush-vv for Radeon VII Device Properties
- AMD Radeon FAQs (Very informative)
- Video Bitrate Test Files
- Enabling XFX RX 6600 XT in macOS Monterey